
Yes, I went over the top with this image. Sooner or later however you are going to want to create those beautiful fluffy Cumulus clouds in Maya. You will no doubt find several tutorials online showing you how to do this. They show you how to use fluids to create a cloud but not how to make them look NICE.
The top image took 42 minutes to render at 720p on a AMD 6 core 1090T chip. Not amazing but pretty decent for that kind of cloud detail. What good is a beautiful cloudscape if it takes a year to render?

I will give you the recipe to create the image you see above which renders in just 15 seconds. Then describe the affect some of the settings have on these clouds and what settings seriously effect the render time.
Select Fluid effects top menu then create 3D container.
If you want to have a more accurate representation of what the clouds will look like in real time you have to select the "Textured" Icon in your view port. (looks like a little checked cube)
Pull up the attribute editor for the fluid container you created.
Set X,Y,Z Resolution in Container Properties to
X: 75
Y: 10
Z: 75
This is the detail level of the fluid
Size X,Y,Z set to
X: 8
Y: 3
Z: 8
Overall Size of the block.
Under COntents Method set
Density: Off(zero)
Velocity: Off(zero)
And the rest of those in that section to Off(zero)
Under Surface Section in the attributes Make sure "Volume Render" is checked
Surface threshold: .01
Now farther down to the "Shading" section. THIS ONE IS IMPORTANT. Click the colored block next to Transparency it to pull up it's color chooser. Now in the sliders use settings.
H: 213.33
S: .506
V: .002
Click accept. Transparency makes a HUGE difference in Render time of these clouds if the Transparency slider is very far to the right. Render times will escalate.
Glow Intensity: .002
Drop off Shape: Cube
Edge Dropoff: .273
Now for the "shading" "Matte Opacity" sections I have a still so you can see what's going on. Make these settings exactly for the numbers approximately for the colors.
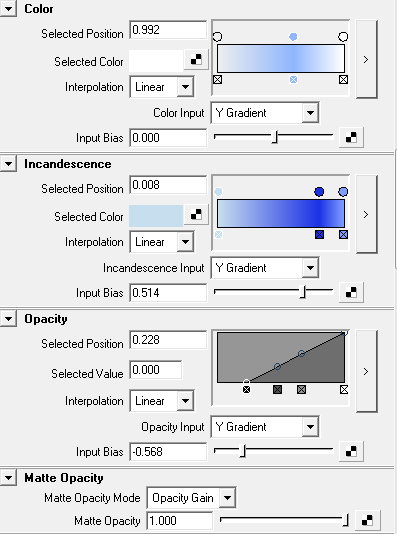
NOTE: Under the Opacity, Input Bias I have -.568 This setting effects how "eaten away" your clouds are. from a solid cube to nothing. Changing this number affects the look a lot.
Now we are at the "Shading Quality" and "Textures" sections. Here is the still with the settings. A lot of numbers and settings, duplicate them exactly.
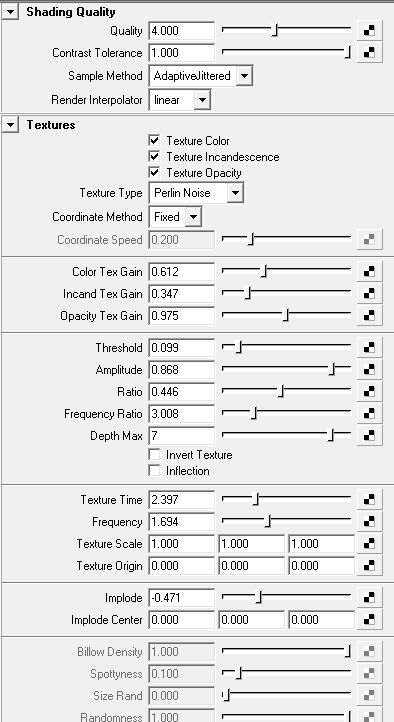
NOTE: Shading Quality:
A higher number here 5-6 will increase render time and realism of the cloud. Lower number 2,3 faster renders, lower realism.
NOTE: Color Tex Gain: Effects the colors distribution within the cloud shading. I found that unless I played with this value the colors I'd chosen for the cloud gradient in the "color" section wouldn't show up where I wanted them.
NOTE: Depth Max: Controls the amount of detail within the cloud. A higher setting will give lots of nice little detail at the expense of render time of course.
Lastly, "Lighting" and "Render Stats" sections
Make sure Check "Self shadow" and "Hardware shadow"
Shadow Opacity: 1.0
NOTE: Shadow opacity affects the way your clouds look a ton play with this value.
Now finally render settings. Make sure "mental Ray is slected as your renderer. Let's get a good speedy render going first. Create a physical sun and sky in the "indirect lighting" panel of your "render settings"
Under the "Quality" Tab select the production quality preset.
Then change "Max sample level" to -1
Now "Indirect lighting" tab make sure "Final Gathering" is checked. And make a render. Should go pretty fast.
When it comes time to make your final render you can turn the Max sample level to 1 or 2.

There are obviously a myriad of settings that affect how these clouds will look. I hope this gives you a starting place that is a lot more real looking than most of the tutorials you will find on the web.
Please let me know if you have any improvements on this recipe i'd love to implement them. Let me know if you have any questions.
Here is a video clip someone created using this information to help them! Thanks for sharing goofypixel!
https://www.youtube.com/watch?v=8MasG3dCasU#t=17
I just bumped into an image someone made using this tutorial! I thought that was pretty neat. Check it out!

Please check "HELPFUL" below if it was, if not COMMENT below and tell me why! Don't miss another tutorial or tip! Subscribe to Maya Zest